General Setup Instructions
Step 1. Open Settings
Open the Start menu and select Settings.

Step 2. Open Language & region
In Settings, select Time & language from the left sidebar. Then select Language & region.

Step 3. Check Your Installed Languages
If your language isn’t listed, select Add a language. If it’s already installed, choose your language below and skip to Step 5.

Language-Specific Instructions
At a Glance
Step 4. Add your language
In the Windows dialog, search for and select “Amharic”, then choose Next.
On the next screen, leave Set as my Windows display language unchecked (if shown), then select Install.
Step 5. Check the recommended keyboard
Under Preferred languages, find your language. Open the three-dot menu next to it and choose Language options.
Under Keyboards, check for the recommended keyboard. Add it only if it is missing.
Keyboard labels currently come from the original Windows 10 materials. Verify them in Windows 11 before publishing this guide.
If your school manages this computer and restricts changes, contact IT before testing.
Step 6. Switch keyboards and start typing
Select the input language indicator on the right side of the Windows taskbar (for example, ENG), then choose Microsoft Pinyin. You can also press Windows + Spacebar to switch between installed keyboards.
View the on-screen keyboard
To open the optional on-screen keyboard, press Windows + Ctrl + O, or search for On-Screen Keyboard in Start.
Try typing
Editor reference: Open each language expander to edit its six-field table, optional typing guidance, and keyboard image. The table drives the dynamic guide; Editor notes are for maintenance only. Keep all 27 expander IDs so existing language links continue to work. This section is hidden from visitors.
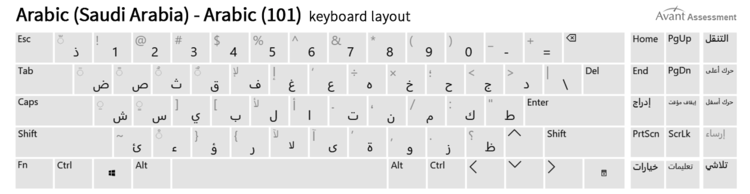
أنت مترجم مواقع احترافي. لا تترجم أي محتوى محصور في أقواس مربعة مزدوجة (مثل هذا). اترك تلك الأجزاء بالضبط كما هي.
| Field | Value |
|---|---|
| Search term | أنت مترجم مواقع احترافي. لا تترجم أي محتوى محصور في أقواس مربعة مزدوجة (مثل هذا). اترك تلك الأجزاء بالضبط كما هي. |
| Windows language | Arabic (Saudi Arabia) |
| Native name | العربية (المملكة العربية السعودية) |
| Keyboard | Arabic (101) |
| Source | Microsoft Windows input profiles |
| Editor notes | Responses should be typed in Modern Standard Arabic. |
For Avant testing, type responses in Modern Standard Arabic.
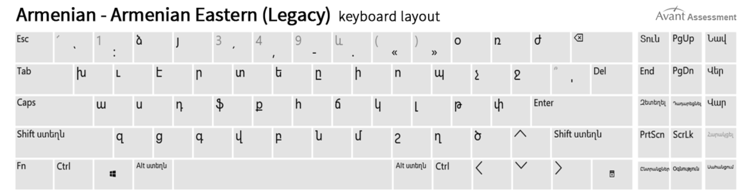
أرميني
| Field | Value |
|---|---|
| Search term | أرميني |
| Windows language | أرميني |
| Native name | Հայերեն |
| Keyboard | Armenian Eastern (Legacy) |
| Source | Microsoft Windows 11 keyboard layout gallery |
| Editor notes | Armenian Eastern (Legacy) is available in Microsoft’s Windows 11 keyboard gallery. It may need to be added manually; Armenian Phonetic is a separate layout. |
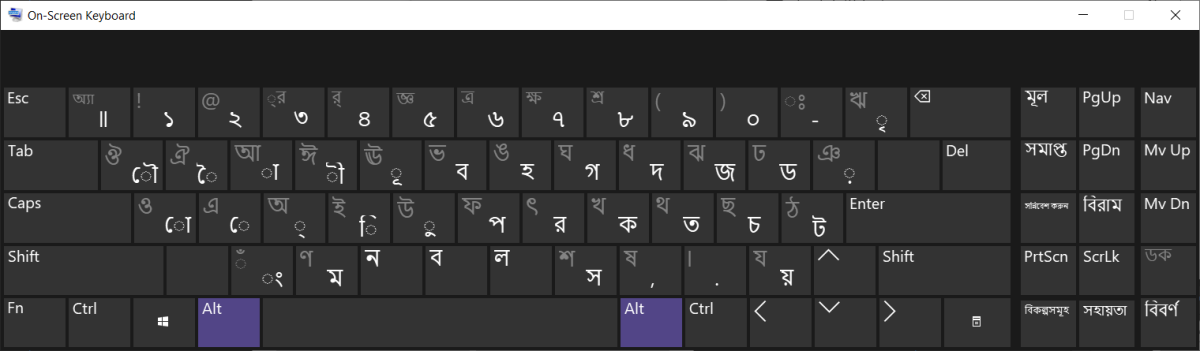
بنغالي
| Field | Value |
|---|---|
| Search term | بنغالي |
| Windows language | Bengali (India) |
| Native name | বাংলা (ভারত) |
| Keyboard | Bangla – INSCRIPT |
| Source | Microsoft Windows input profiles |
| Editor notes | Look for Bangla INSCRIPT among the installed keyboards before adding it again. |
يوناني
| Field | Value |
|---|---|
| Search term | يوناني |
| Windows language | يوناني |
| Native name | Ελληνικά |
| Keyboard | يوناني |
| Source | Microsoft Windows input profiles |
| Editor notes | Microsoft confirms Greek as the Windows default keyboard for Greek; the existing layout graphic is a historical reference. |
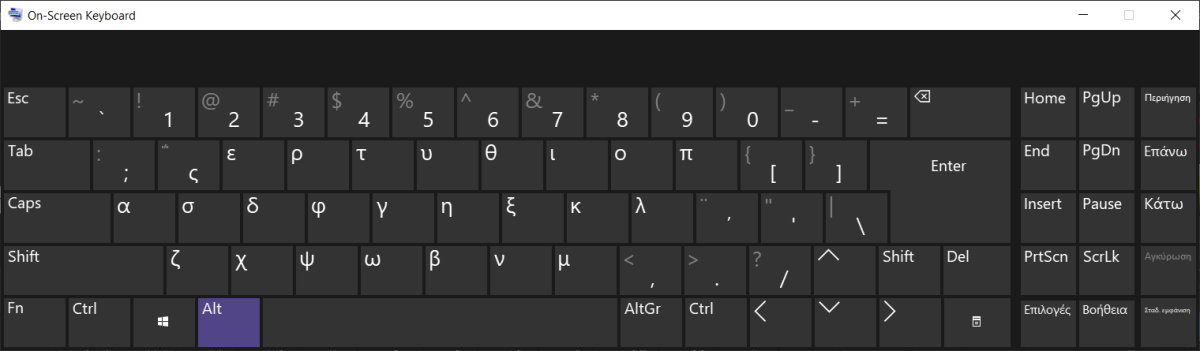
عبري
| Field | Value |
|---|---|
| Search term | عبري |
| Windows language | عبري |
| Native name | עברית |
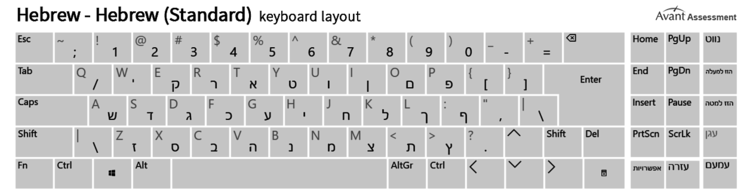
| Keyboard | Hebrew (Standard) |
| Source | Microsoft Windows input profiles |
| Editor notes | The old guide recommends Hebrew (Standard), which is distinct from the other Hebrew option. |
هندي
| Field | Value |
|---|---|
| Search term | هندي |
| Windows language | هندي |
| Native name | हिन्दी |
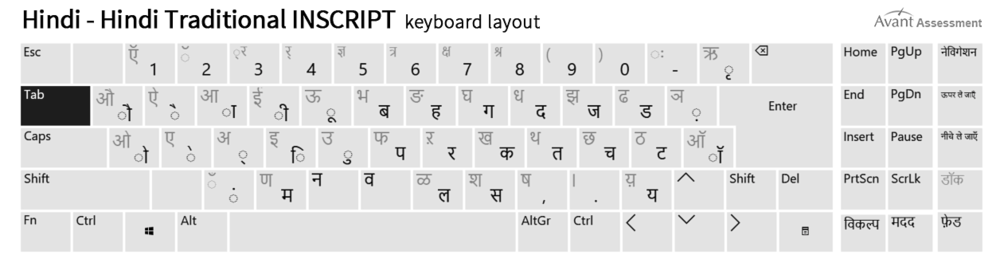
| Keyboard | Hindi Traditional |
| Source | Microsoft Windows input profiles |
| Editor notes | The Windows 10 screenshot labels Hindi Traditional as an INSCRIPT layout. |
كانادا
| Field | Value |
|---|---|
| Search term | كانادا |
| Windows language | كانادا |
| Native name | ಕನ್ನಡ |
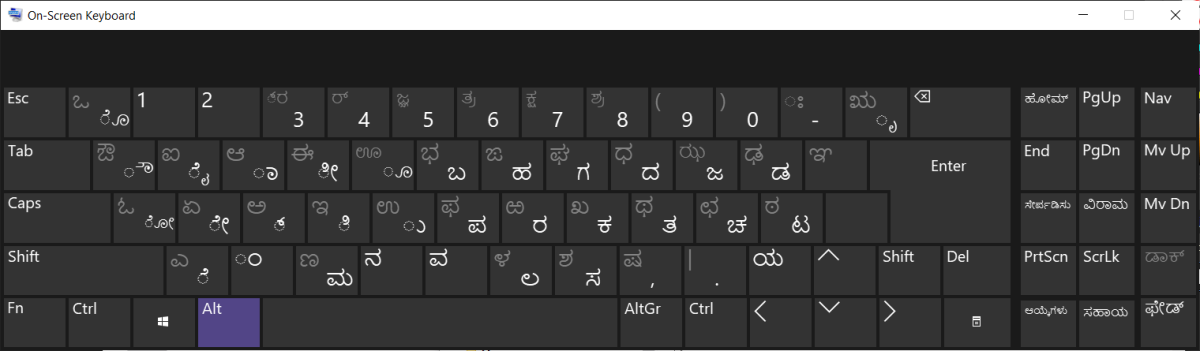
| Keyboard | Kannada INSCRIPT |
| Source | Microsoft Kannada IME documentation |
| Editor notes | Microsoft documents Kannada INSCRIPT as the default keyboard when installing Kannada in Windows 11. |
خمير
| Field | Value |
|---|---|
| Search term | خمير |
| Windows language | خمير |
| Native name | ខ្មែរ |
| Keyboard | خمير |
| Source | Microsoft Windows input profiles |
| Editor notes | The original guide specifies Khmer but does not identify a distinct keyboard choice. |

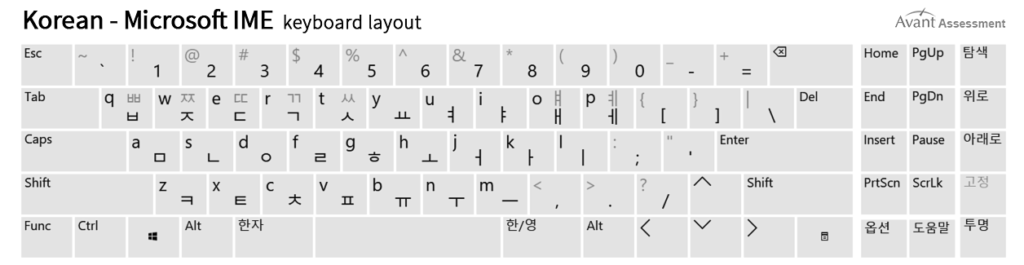
كوري
| Field | Value |
|---|---|
| Search term | كوري |
| Windows language | كوري |
| Native name | 한국어 |
| Keyboard | Microsoft IME |
| Source | Microsoft Windows input profiles |
| Editor notes | Microsoft lists Microsoft IME as the Windows input method for Korean; the display name or toggle behavior may vary by Windows version. |
If Microsoft IME is still in English mode, switch it to Korean input before typing. Shift can access additional characters.
ماراثي
| Field | Value |
|---|---|
| Search term | ماراثي |
| Windows language | ماراثي |
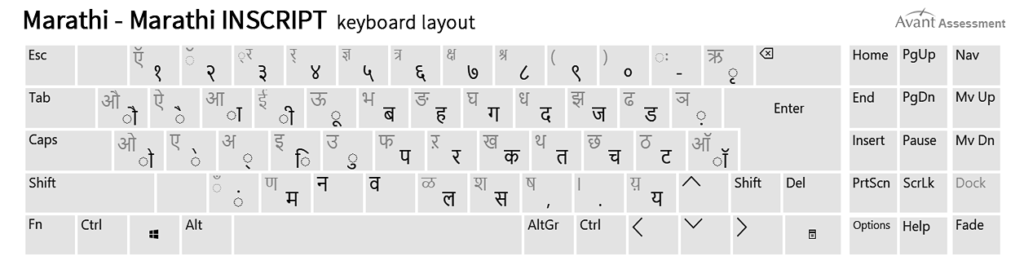
| Native name | मराठी |
| Keyboard | Marathi INSCRIPT |
| Source | Microsoft Marathi IME documentation |
| Editor notes | Microsoft documents Marathi INSCRIPT as the default keyboard when installing Marathi in Windows 11. |
نيبالي
| Field | Value |
|---|---|
| Search term | نيبالي |
| Windows language | Nepali (Nepal) |
| Native name | नेपाली |
| Keyboard | نيبالي |
| Source | Microsoft Windows input profiles |
| Editor notes | The original guide installs Nepali (Nepal) but does not identify a separate layout name. |

بشتو
| Field | Value |
|---|---|
| Search term | بشتو |
| Windows language | بشتو |
| Native name | پښتو |
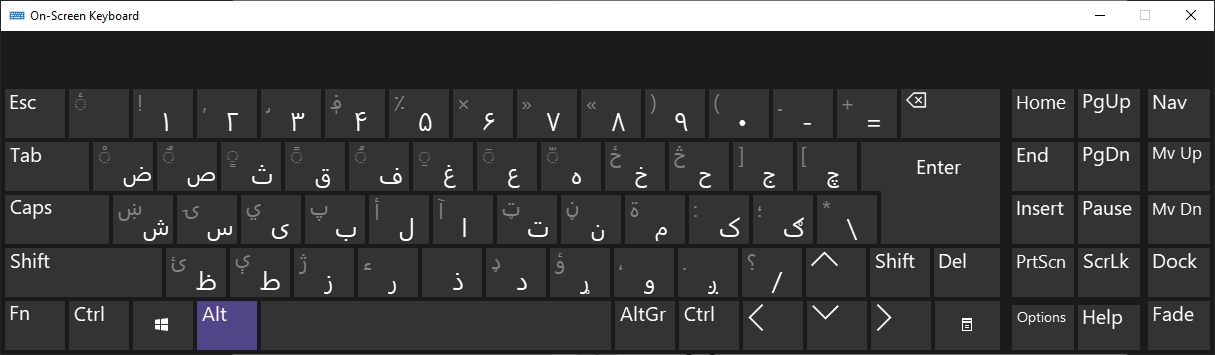
| Keyboard | Pashto (Afghanistan) |
| Source | Microsoft Windows input profiles |
| Editor notes | Windows uses the Pashto (Afghanistan) layout. The original image labeled Thai was incorrect and has been replaced with a user-supplied Pashto keyboard screenshot on the production site; compare it with the installed layout if Windows differs. |
الفارسية الفارسية
| Field | Value |
|---|---|
| Search term | Persian |
| Windows language | Persian |
| Native name | فارسی |
| Keyboard | Persian |
| Source | Microsoft Windows input profiles |
| Editor notes | Microsoft confirms Persian as the default keyboard for the Persian language entry, with Persian (Standard) as an alternative. |

بنجابي
| Field | Value |
|---|---|
| Search term | بنجابي |
| Windows language | Punjabi (Gurmukhi) |
| Native name | ਪੰਜਾਬੀ |
| Keyboard | Punjabi INSCRIPT |
| Source | Microsoft Punjabi IME documentation |
| Editor notes | Microsoft documents Punjabi INSCRIPT as the default for Punjabi (Gurmukhi); Punjabi Phonetic is a separately installable option. |

روسي
| Field | Value |
|---|---|
| Search term | روسي |
| Windows language | روسي |
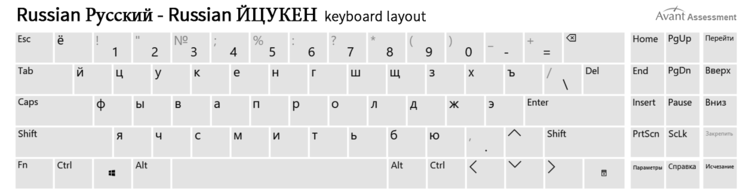
| Native name | Русский |
| Keyboard | روسي |
| Source | Microsoft Windows input profiles |
| Editor notes | The older guide chooses the standard Russian keyboard rather than Russian – Mnemonic or Typewriter. |
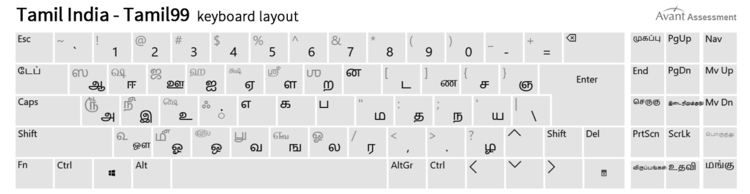
تاميل
| Field | Value |
|---|---|
| Search term | تاميل |
| Windows language | Tamil (India) |
| Native name | தமிழ் (இந்தியா) |
| Keyboard | Tamil 99 |
| Source | Microsoft Windows input profiles and keyboard layout gallery |
| Editor notes | Microsoft confirms Tamil 99 as a Windows 11 keyboard and the default input profile for Tamil (India). |
تيلوغو
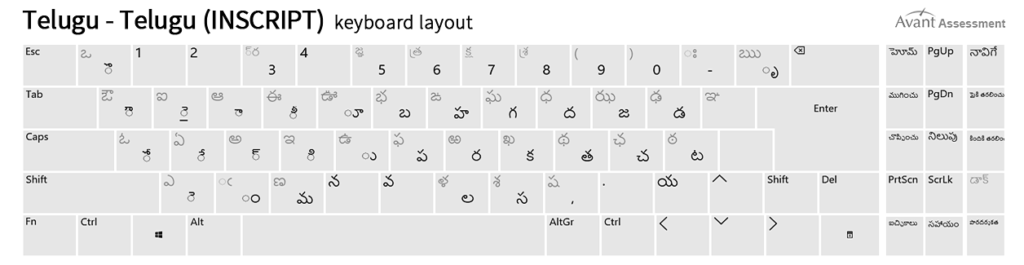
| Field | Value |
|---|---|
| Search term | تيلوغو |
| Windows language | تيلوغو |
| Native name | తెలుగు |
| Keyboard | Telugu INSCRIPT |
| Source | Microsoft Telugu IME documentation |
| Editor notes | Microsoft documents Telugu INSCRIPT as the default keyboard when installing Telugu in Windows 11. |
تايلاندي
| Field | Value |
|---|---|
| Search term | تايلاندي |
| Windows language | تايلاندي |
| Native name | ไทย |
| Keyboard | Thai Kedmanee |
| Source | Microsoft Windows input profiles |
| Editor notes | Microsoft confirms Thai Kedmanee as the default keyboard for Thai. |

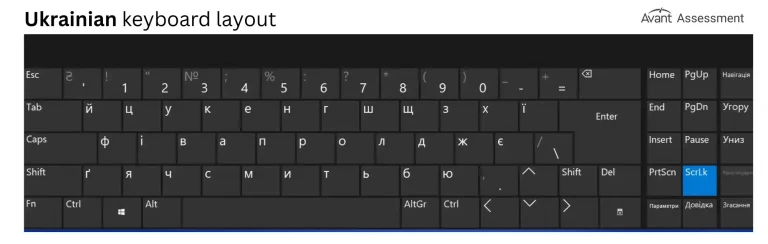
أوكراني
| Field | Value |
|---|---|
| Search term | أوكراني |
| Windows language | أوكراني |
| Native name | Українська |
| Keyboard | Ukrainian (Enhanced) |
| Source | Microsoft Windows input profiles |
| Editor notes | The older guide shows Ukrainian (Enhanced), not an unspecified default Ukrainian layout. |
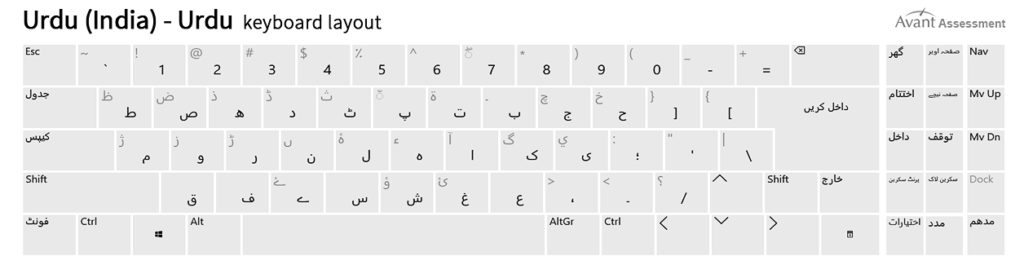
أردو
| Field | Value |
|---|---|
| Search term | أردو |
| Windows language | Urdu (India) |
| Native name | اُردو (بھارت) |
| Keyboard | أردو |
| Source | Microsoft Windows input profiles |
| Editor notes | Choose Urdu (India), rather than Urdu (Pakistan), for the captured old-guide workflow. |
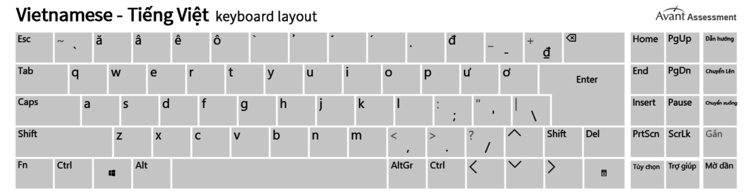
فيتنامي
| Field | Value |
|---|---|
| Search term | فيتنامي |
| Windows language | فيتنامي |
| Native name | Tiếng Việt |
| Keyboard | فيتنامي |
| Source | Microsoft Windows input profiles (available layout) |
| Editor notes | The older guide recommends the Vietnamese keyboard; Windows 11 still needs verification. |
Use the traditional فيتنامي keyboard shown in the layout diagram. Press Shift or Ctrl + Alt to access additional characters. Accented characters are entered using the 1-0 number keys and the +, [, and ] keys, as shown in the diagram. Vietnamese Telex and Number Key-Based are separate input methods with different keystrokes.